
powered by Advanced iFrame. Get the Pro version on CodeCanyon.
Trail Details
")
Getting Started
Hikers usually start at one of two areas. There is the Museum Trail (most popular) that starts behind the Palms Springs Art Museum and the North Lykken Trail at the end of West Ramon Road. I prefer to start at Ramon Road. The trail is easier to follow and doesn’t start off as steep.
Ramon Road to Lykken Trail Sign
You start the hike walking up a dirt road. (very) Soon after you start, you should see a trail weaving it’s way up through the rocks on your left. You should also start seeing white dots marking the trail. About a half mile after you start, you will see a sign that says ‘Lykken Trail.’ It used to have some artwork on it that said ‘It’s raining sunshine.’ but I believe this is gone now.

Lykken Trail Sign to Museum Trail Junction
Follow the trail for another mile or so and you will find a large cairn in the the middle of the trail. The trail straight ahead is the Museum Trail. You want to take the trail to your left. At this point, the pace chart may give you an idea of how long it might take you to complete the hike.


Museum Trail Junction to Painted Rock
Just a few feet beyond the junction, you will find two flat rocks with some words painted on them. If you are facing the rocks, the trail continues to your left.


Painted Rock to Rescue Box 1
In my experience, this is where many first-timers begin to figure out what they’ve gotten themselves into. There is one particular climb that switchbacks up the side of a ridge that has many shortcuts. Please do your best to stick to the trail – it prevents erosion and unless you’re really fit, you may regret the extra effort it took to use the shortcuts before your hike is finished. Also when looking to the west at certain points of this section (or the next), you start to catch glimpses of the tram station. It looks like a really bright star or head lamp.
The rescue box contains emergency supplies, please do not open it or take anything from it unless you really need it.


Rescue Box 1 to Doreen’s 4300 Foot Marker
The 4300 Foot Maker is roughly the halfway point for both mileage and elevation for this hike. When I plan this hike, I adjust our start time so that we can be near 4300 Foot Marker to watch the sunrise. It’s a great spot to see the sun come up and if I’m at this landmark for sunrise, I know I should be able to avoid the hottest part of the day.


4300 Foot Marker to Tombstone Rock
The 4300 Foot Marker roughly marks beginning of the section known as the ‘Neverending Ridge’. This ‘ridge’ encompasses several landmarks including: Tombstone Rock, Rescue Box 2, Florian’s Cache and Flat Rock/Dry Falls. It This section of the hike actually that looses a significant amount of elevation due to some downhill terrain.
Looking to the NNW, you can catch glimpses of San Gorgonio, which is the tallest peak in Southern California.


Looking west, you should be able to identify Coffman’s Crag and the tram station before you drop down into the gully where Tombstone Rock is.


As you near Tombstone Rock, you drop down into a little gully. The deer seem to hang out in this area and we see them on most of our hikes.

It is really easy to miss Tombstone Rock. I didn’t see it until my 3rd or 4th trip up Skyline.

Tombstone Rock to Rescue Box 2
This short section is only about 3/10ths of a mile.

Rescue Box 2 to Florian’s Cache
The trail continues to climb here until it levels off for a short bit. To your right there will be some steep drop offs. To your left, keep your eye out for Florian’s Cache, which is a 5 gallon bucket (usually) containing bottles of emergency water. Please do not take any of the water unless you really need it.

Florian’s Cache to Flat Rock / Dry Falls
As you leave Florian’s Cache, you can sometimes see hikers on the trail above Dry Falls.

Dry Falls is a good place to take a long food break (if you need one) and mentally prepare for the challenge ahead.


Dry Falls to The Traverse
I’ve heard this section called by different names such as ‘The Enchanted Forest’ and ‘The Manzanita.’ I’ve even heard a fellow hiker call it ‘Hell.’ This is where the real challenge begins – you gain nearly 1600 feet over the next 1.25 miles! For many, this is part of the hike is also very challenging mentally, especially if they know what lies ahead. You only have 2.5 miles left to the tram station, but if you’re hiking at a 9 hour pace, you still have 3 hours until you are finished.
The climb is relentless and it is likely the sun will be very hot when you reach this section. There is virtually no shade until you reach the 7,000′ mark and you start seeing scrub oaks. As you near the Traverse, you slip behind a ridge and the temperature will drop dramatically.


The shade is usually a welcome change, but the shade helps create the dangerous conditions on The Traverse. The shade and resulting cooler temperatures help hold the snow and ice in this area.

The Traverse to Coffman’s Crag
If there is ice or snow on the trail, this section can be quite dangerous. The trail becomes quite narrow with a steep drop-off to your right. Looking at the stats, the trail does not appear to be that steep, and it may seem easy compared to the last section, but there are a few areas that are very strenuous.


The trail continues in a northwest direction until it makes a hard left in front of Coffman’s Crag.

Coffman’s Crag to Grubb’s Notch/Hallelujah Rocks
This is the steepest section of the trail. It is only .35 miles, but at a 9 hour pace, it takes around 40 minutes. When you finish, it will be quite obvious why some call the end of this section ‘The Hallelujah Rocks’.


Photo Credit: GMendoza

Grubb’s Notch to Mountain Station
The trail flattens out here. Go to the right and take the service road to the tram.

Photo Credit: GMendoza
This section goes quite quickly until you reach the dreaded ramp at the base of the tram station.

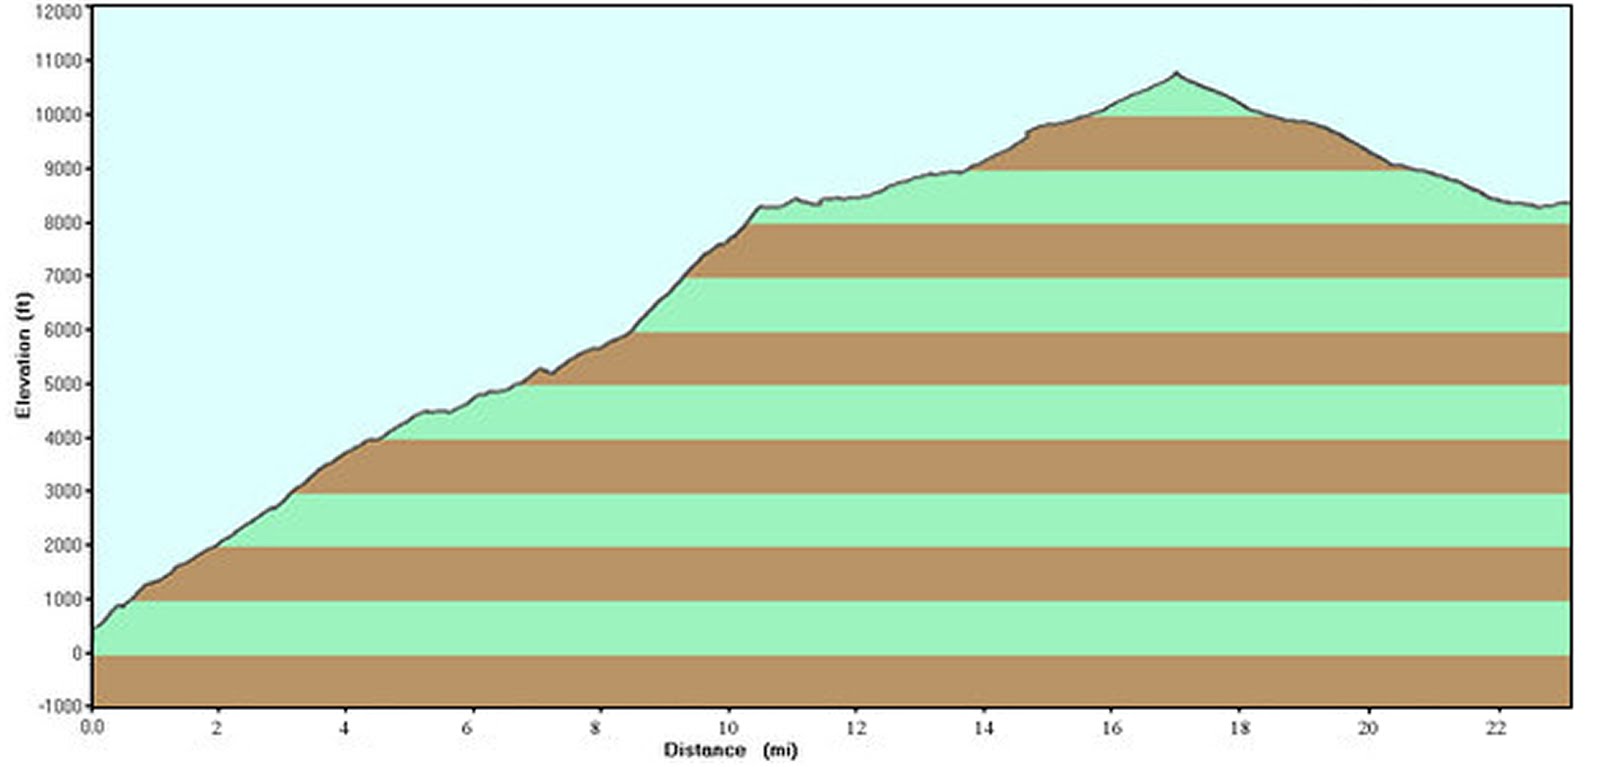
If you are hiking to the peak to complete ‘Cactus to Clouds,’ take a left when you arrive at the ramp. A couple hundred yards from the ramp, you will see the ranger station on your right. You need to stop here and fill out a permit. The trail to the peak is easy to follow and well documented. Most of the people I hike with have completed the roundtrip in 5-8 hours. Here are some details:
The trail profile:
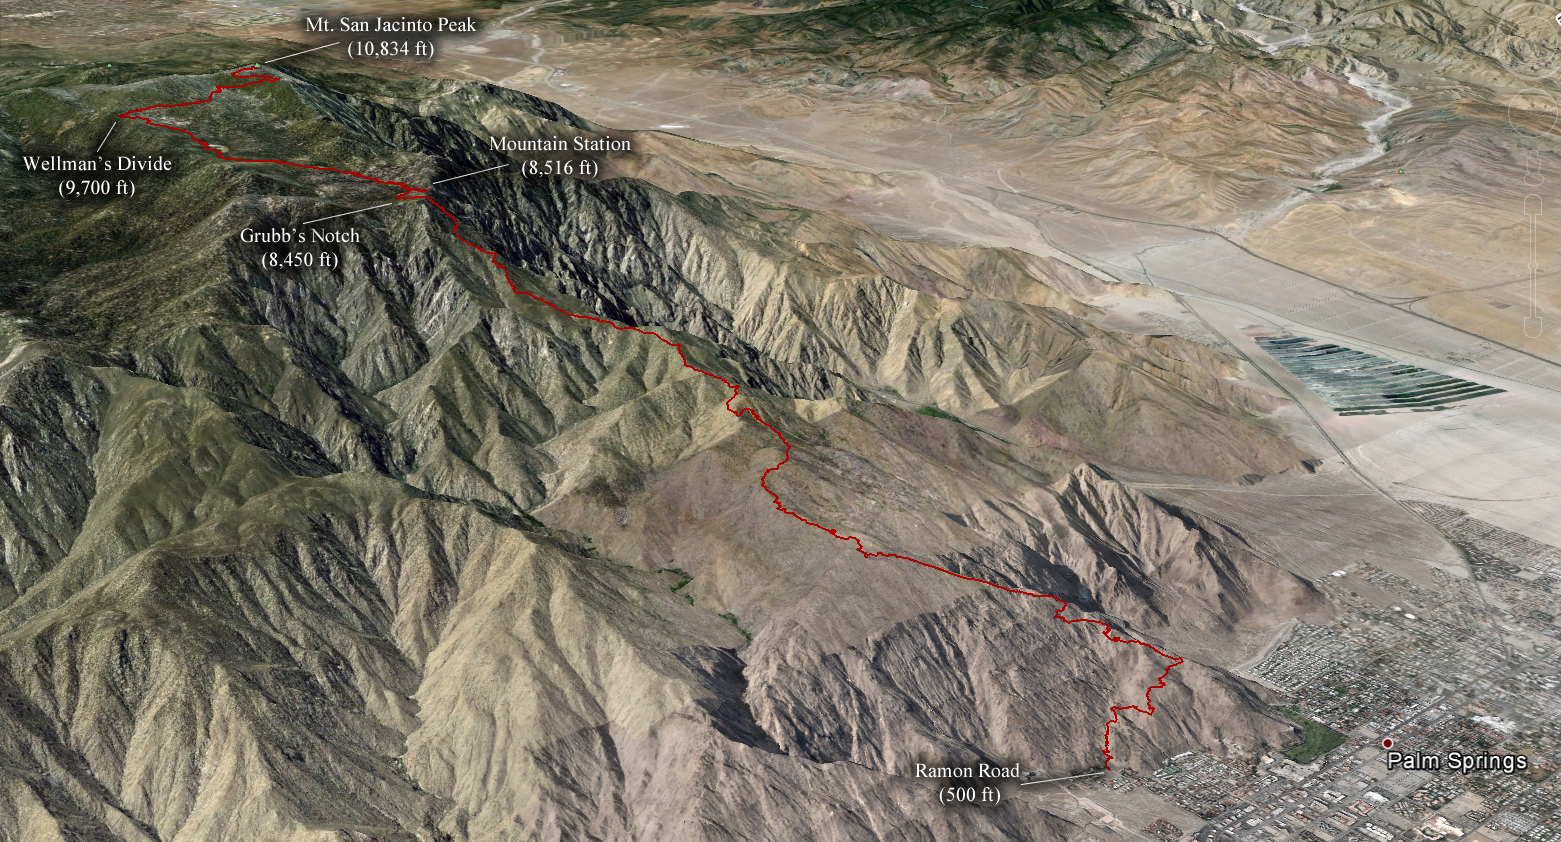
A Google Earth image of the route
For Further Reading:
Trail Description w/ Trip Report: Skyline Trail (also known as the Cactus to Clouds Trail)
Trail Description: America’s Hardest Day Hikes
Trail Description: Ten Best Hikes
Trip Report: http://www.everytrail.com/view_trip.php?trip_id=178810
Cactus to Clouds Hiking Guide: http://www.mtsanjacinto.info/skyline/skyline.html
Http iframes are not shown in https pages in many major browsers. Please read this post for details.
powered by Advanced iFrame. Get the Pro version on CodeCanyon.